Migrating PowerBuilder DataWindows to Web (Part 2)
by John Browne, on Mar 4, 2019 2:20:17 PM
In Part 1, we reviewed the nature and popularity of PowerBuilder DataWindows, and yes PowerBuilder was pretty cool back in the day. But so were leisure suits. Now, however, nobody is birthing new PowerBuilder developers so it makes sense to get off it. And since the core of a PowerBuilder app is lots of DataWindows, I want to show how WebMAP can migrate PowerBuilder DataWindows to a modern web app.
Let's look at the "System Tree" (sort of a solution explorer):
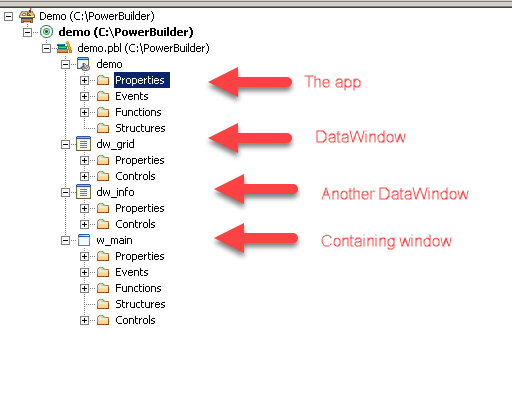
A convention for PowerBuilder apps is to prefix the names of things with what they are (see Hungarian notation). So the parent window is called a w_main and the DataWindows are called dw_grid and dw_info respectively. And because this is so familiar to PowerBuilder developers, we want to keep this naming convention in the C# code after we migrate it, even though Hungarian notation is out of favor today.
How does the migration work?
WebMAP is the tool from Mobilize that can convert desktop apps into web apps, working at the source code level. If you are unfamiliar with our tools, the idea is that you point WebMAP at the root folder of your PowerBuilder solution and it will generate a completely new folder tree with all new code. Then all you have to do is compile the new code and voila! There's your modern web app.
If only it were that simple.
In reality, moving from desktop to web--regardless of the source programming language or framework--exposes a number of disconnects between the two platforms, something I've blogged about in the past. Without some kind of assistance from automation like WebMAP this kind of effort can take years for significant apps. For example, take those DataWindows. As we mentioned in Part 1, the presentation of data in a DataWindow can be formatted like a paper report--in fact, it's a key property of DataWindows. But printing from a web application is completely different from a desktop app. Desktop (Windows) apps can call Windows services that manage printers and print queues. They can offer the user a choice of all the installed printers--whether attached or networked, allow for specific control of the printer, show a preview of the output, and more. The browser can't even talk to the hardware. So web apps typically handle printing by creating a digital print--like a PDF file--and offering the user a link to download the file to the local machine for handling (viewing or printing) outside of the application.
Applications with no connections to printers, scanners, cash registers, or other hardware are arguably simpler to migrate--at least from that standpoint--than those that have those kinds of connections. (NB: lots of apps DO have hardware dependencies, and we've developed a way to connect the web apps to physical devices, but that's a topic for another blog.)
Our little PowerBuilder demo app doesn't need any hardware, so we can skip that step in our migration.
Let's migrate.
Ok, it's done.
Wait, what? Where's the migration step?
Actually the migration process itself is boring. Pick a source path, an output path, and push "go." There is literally nothing interesting to see, until it's done, then we see this:
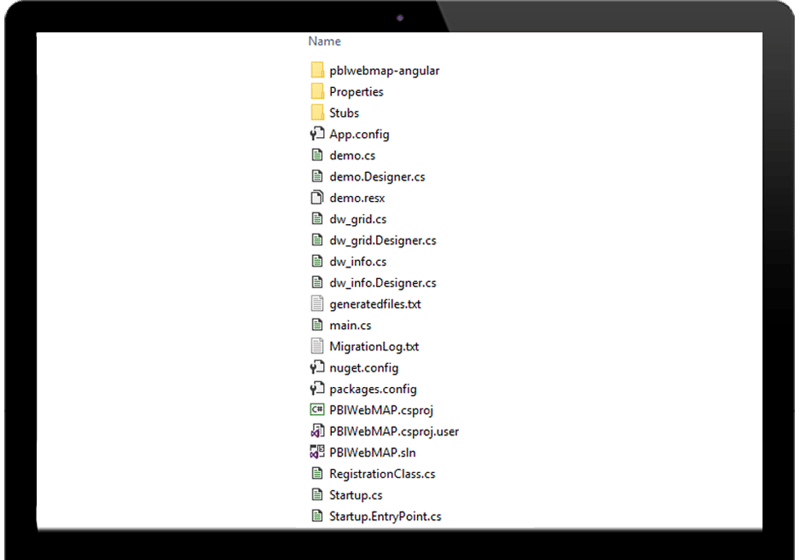
There are a lot of files there, so let me break it down a bit. Of the three folders, you can ignore Properties and Stubs (those are support files). The pblwebmap-angular folder is our front-end (client side) project. We'll come back to that shortly.
Among all the remaining files (at the root) we see a .cs and a Designer.cs file for each of our PowerBuilder windows: the app (demo) and both the DataWindows (info and grid) as well as a standard main.cs file.
For various reasons we have split the front-end (client side) code from the back-end (server side) code in our code tree. At the moment, it's a little easier to work with Angular, JavaScript, HTML, and CSS using Visual Studio Code (as opposed to Visual Studio). And, likewise, Visual Studio (not Code) has amazing capabilities when writing and debugging C# and .NET apps.
Let's start with the client side code. I'm going to open the demo1Site-angular folder in Code:
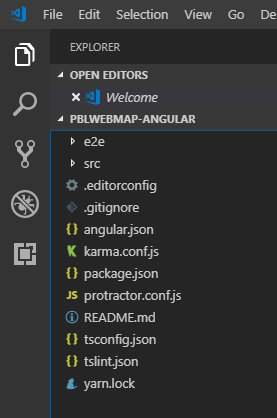
Let's home in on a couple of things we can find here, starting with the package.json file:
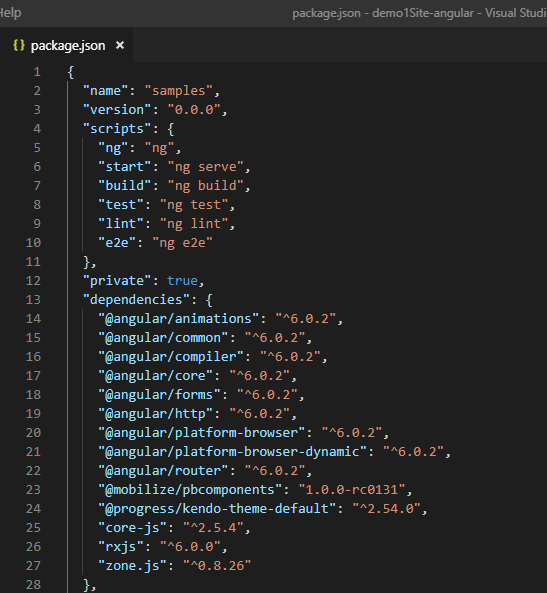
This shows us the dependencies our client-side app requires. What's notable here is that we're using Angular 7, Kendo UI for Angular, and some PowerBuilder components from Mobilize.
Looking at another key file: angular.json, we see a few more interesting things:
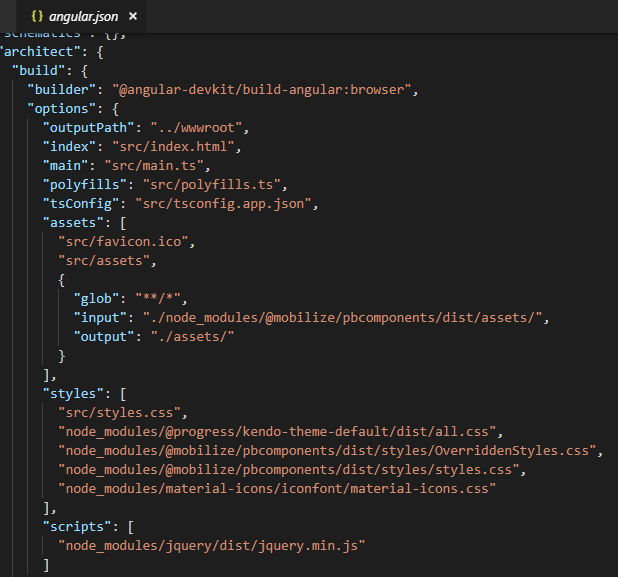
Note here that the CSS styles that are imported include the Kendo default theme and some specific CSS files from Mobilize to handle PowerBuilder requirements. Progress has three themes for their Angular UI elements that can be swapped as easily as editing this file here. Or, you can build your own with their Theme Builder. In any event, having the UI created in HTML with cascading style sheets gives you a lot of control over the look and feel of your application.
Note: the standard output for Mobilize.Net's tools attempts to mirror the look and feel of the source (legacy) application in order to avoid user confusion or the need for retraining. That doesn't mean it's the right answer for every application, just the one the majority of our customers request.
Where's the beef?
Let's look at the actual code. The source we want to see is in the \src\app\components directory:
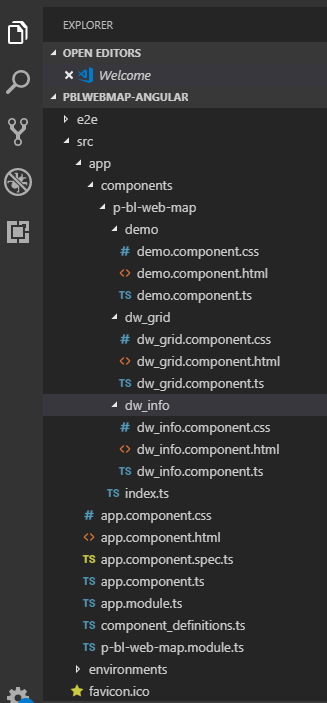
Notice there is a folder for each of our windows: demo dw_grid, and dw_info. Remember our PowerBuilder system tree?

Where, you might ask, is the w_main component in our Angular code? The answer is it went into the bit bucket: we don't need a containing window when we run the app natively in the browser--we're creating HTML and that's what the browser knows how to render.
Ok, back to the app structure. I've expanded all three component source folders, so you can see each has the same pattern of files: a template (HTML), a style (CSS file), and a TypeScript file that defines the component, imports, and exports.
Template file
The app (which we'll see in a bit) has two DataWindows inside a container called demo. Looking at the HTML template, we see it contains our two DataWindows (dw_info1 and dw_grid1) and two command buttons (cb_1 and cb_2):
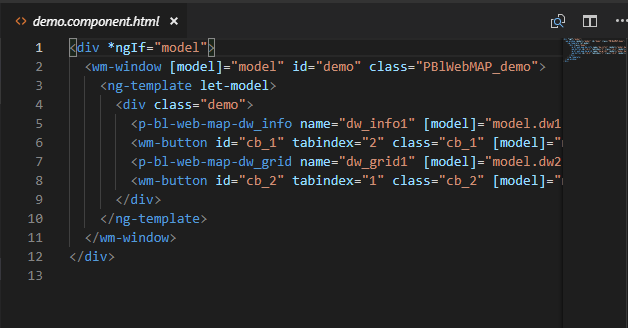
There really isn't much to see here.
Style (CSS)
Let's look at the style sheet file:
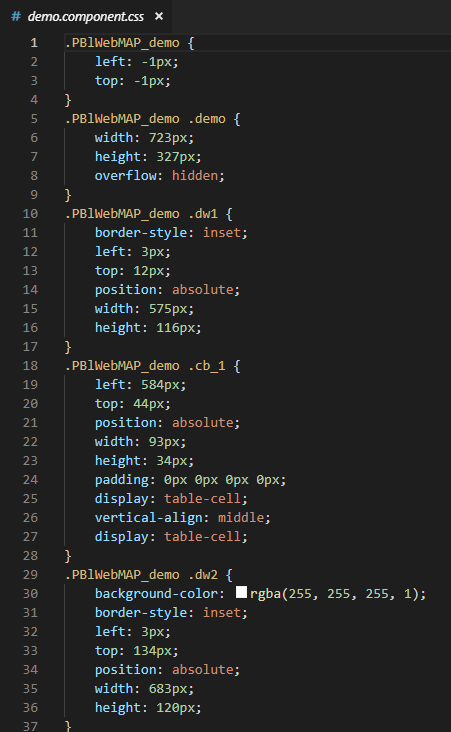
Again, we're trying to position all the visual elements to resemble as closely as possible the original runtime UX of the PowerBuilder app. Of course, since this is CSS you can easily override all the stylings; you can set global styles with the styles.css file, or add your own JavaScript to do magical dancing elves. Whatever, it's going to be your app.
Component definition
Finally, here's the component file--note we use TypeScript which gets transpiled into JavaScript when the app is built for deployment. If you're unfamiliar with TypeScript, it's just a better JavaScript with stuff like types and classes.
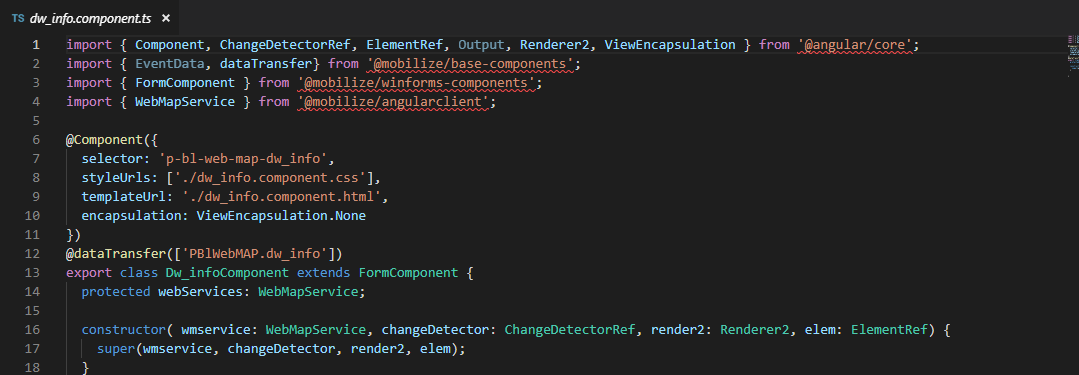
What do we see here? Looking at the import statements, we see we're getting a lot of stuff from angular/core, plus some specific Mobilize WebMAP components. All of these pieces are delivered as packages when you build the front end.
Building the front end
A complete tutorial on how to build an Angular app is beyond the scope of this blog; the short version is you have to download/update all the dependent packages, build the app, and export the minified results. In our case this becomes a folder called wwwroot, which our Visual Studio solution file requires. So without further ado, as they say, let's look at:
Server-side code
To be clear: PowerBuilder is not a language per se; it's a 4GL with its own scripting language. It's familiar looking, certainly readable, but it's not some ANSI standard programming language. When we migrate PowerBuilder using WebMAP, we can turn the scripting language--as well as all the runtime functions, object properties, and events--into either C# using ASP.NET Core or Java using the Spring MVC pattern.
Today we'll look at converting PowerBuilder to ASP.NET Core. In a future blog we'll show the Java version.`
Let's open our solution file in Visual Studio:
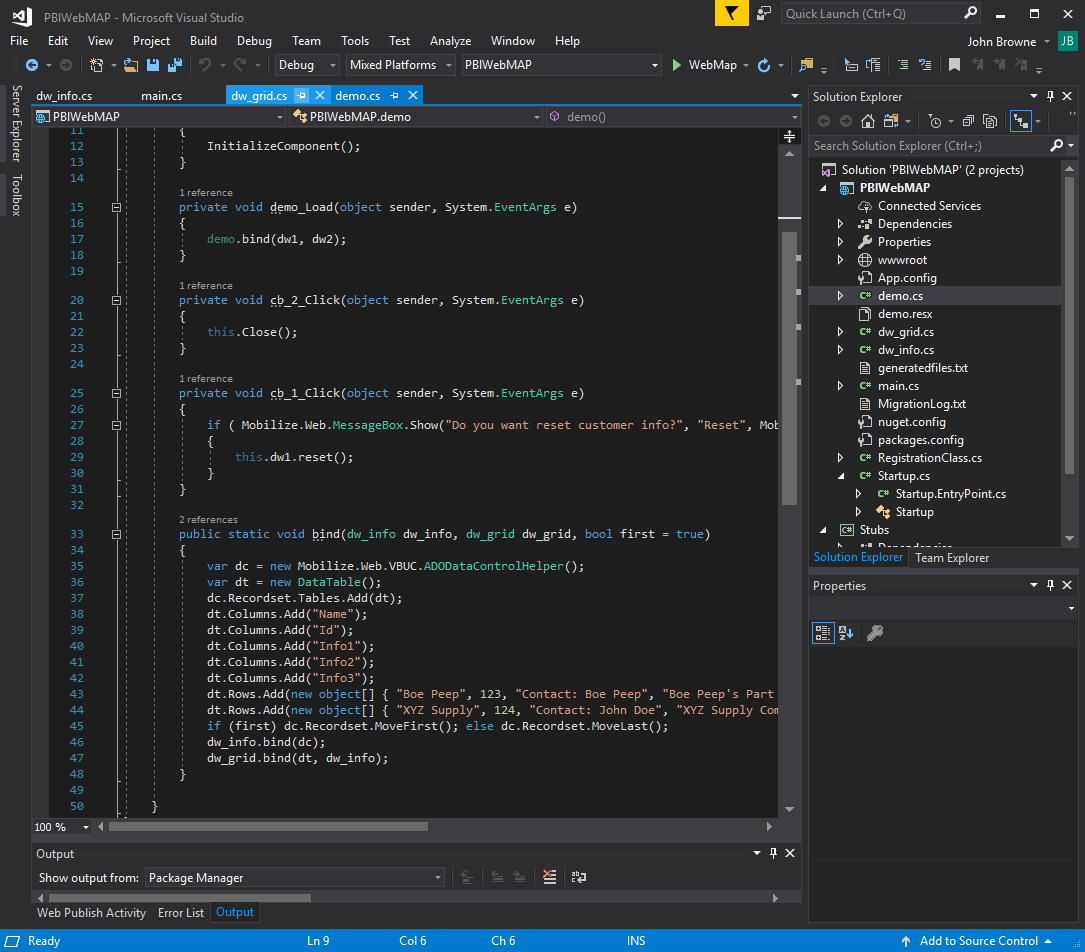
Let's look at the Solution Explorer--we have our wwwroot folder, which we talked about above. Everything the app needs for the front end is in that folder. We have three C# files: demo.cs, dw_grid.cs, and dw_info.cs. We also have a main.cs file, which is just an app entry point.
Before we dive into the code, let's see what this migrated app looks like running in Chrome.
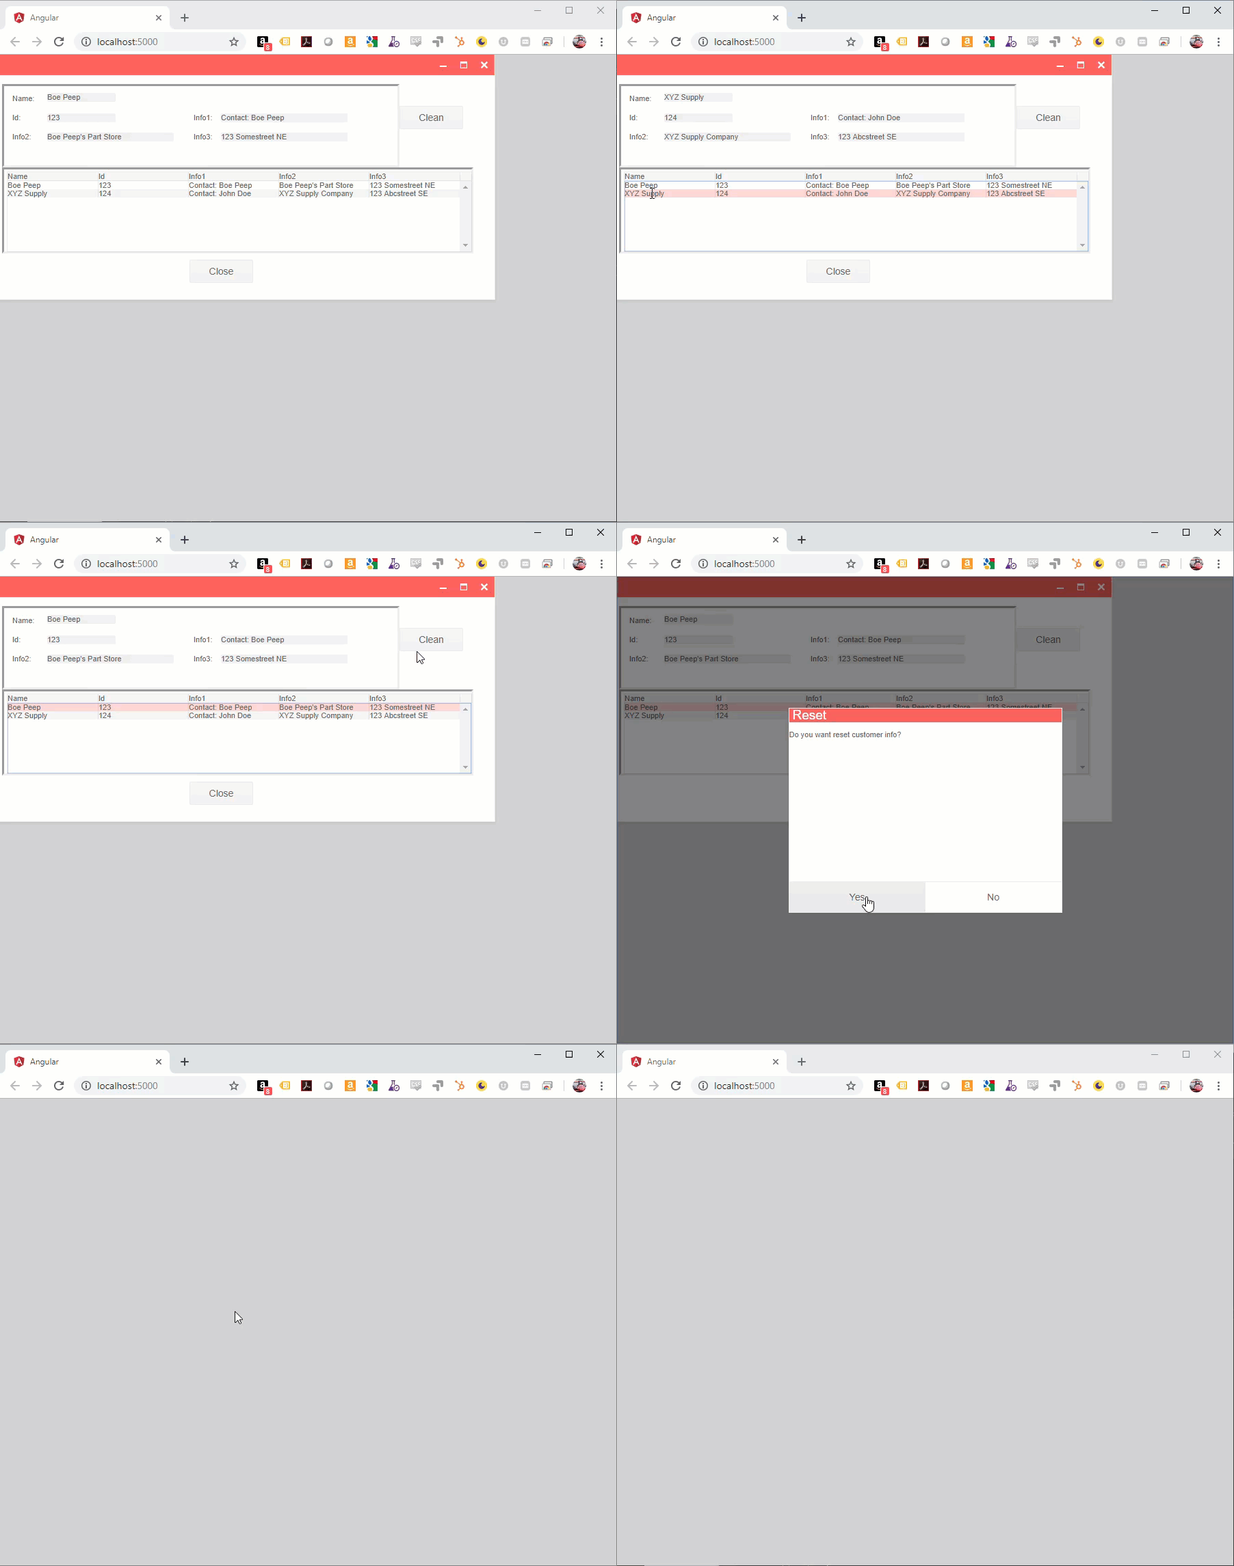
Wow, the same app but running as a native web app in a browser! Again, it may look trivial, but there's several interesting things going on in this app. Let me call your attention to the "Clean" command button--when that is pressed we see a dialog box asking if we want to reset the customer information ("Yes" "No"). This is basically a Windows message box--common on all desktop apps. But on the web it gets tricky--which is why you don't normally see these in a web application.
The problem with modal dialogs on a web app is that they require a suspension of action until the dialog is dismissed. On Windows this isn't an issue. Windows is a single-user, multi-tasking OS, so each application has its own process space and thread. Suspension of thread execution doesn't cause problems for any other process. A web server, on the other hand, is designed to support multiple user sessions simultaneously: that single execution thread can't be suspended just because one user can't make a decision.
When we migrate PowerBuilder message boxes to the web, we have to manage that suspension of state in a reasonably elegant fashion, so that it doesn't damage other session's responsiveness and yet is quickly retrievable when the user dismisses the modal dialog. I could tell you how we do it, but then I'd have to kill you. The beauty of this--from your perspective as a developer--is the code that you work with. Normally handling a modal dialog, with all that entails on a web app, would require a boatload of source code. Instead, through the magic of WebMAP, the code looks like this:

Look familiar? It should, if you've ever written any Windows Forms code at all. Of course, there's a lot going on behind the scenes to keep the source code that simple and elegant. We'll get to that in another blog. As a matter of fact, this one has gone on too long. In the next episode, we get down and dirty with all the code in the new, migrated web application.

